In the final and most important step of the process, you’ll protect the integrity of the structure that you have built by installing a waterproof barrier. A sufficient waterproof barrier must include two layers to resist moisture accumulation, located between plywood and patio roof tiles.
Patio roof waterproofing can be achieved with the following steps:
- Work toward the house.
 Began installing a two-layer waterproof barrier on the patio roof at the farthest point from the housing structure. Once the first waterproofing layer has been rolled out from the farthest point moving toward the house, ends can be trimmed to leave roughly 1 inch of overhang along the perimeter.
 - Remove barrier backing. A waterproof barrier can be folded in half to remove plastic backing before adhering it in place. Once half of the barrier has been affixed, the same method can be repeated by folding the opposite side to remove backing before sticking it in place. Roll the barrier row by row as you work toward the house; once all rows have been attached firmly, trim any overhang to meet plywood edges.
- Add a second layer. A drip edge can be installed along the perimeter of the roof before a second waterproofing layer is added over the first. The second layer of the waterproof barrier should extend beyond the drip edge by a minimum of a quarter inch. A roller can be used to add pressure and affix waterproofing materials in place directly onto plywood roofing.
The final step in the process of patio roof installation is the easiest by far. Yet it still remains the most critical step to ensure that patio roofing is fully protected from inclement weather conditions and outside moisture corruption.
With the help of several skilled friends, this DIY project can be completed within the course of a day. The cost for additional waterproofing materials may add up to $1000 onto a DIY job. See the average cost of building a patio roof here.
Once a patio roof has been waterproofed, the hard work isn’t done just yet. A patio roof will be finished in its entirety once roof tiles or shingles are added to the top of the roof structure. This extra touch will provide further reinforcement to support the integrity of the patio roof and will also attractively match a house’s existing roofing materials.
Laying tile on a patio roof will use the same skill set as laying tile on a residential or commercial roof. Patio roof tiles can only be laid on an area that has been completely weatherproofed. Gravel may also be added to the roof structure to improve drainage.
In order to match the style of your home or business, patio roofs can vary greatly in design and complexity from the basic guidelines above to include:
Once again, the type of patio design you choose will depend on whether you embark on a DIY project or hire a professional roofer for the job. If you hope to build a basic flat patio roof covering, you can use the steps listed in this chapter to support your DIY project. If you envision a more complex or ornate patio roof, hiring a roofing company is recommended.
As a final word of warning, don’t forget to check building codes before embarking on a project as simple as a patio roof.
If you thought you’d be off Scott free when building a small structure like a patio roof, think again.
Depending on where you live, your city may have specific building codes that govern what type of structure can be built onto your home to cover a patio.
On top of that, your local homeowner’s association may also prohibit permanent structures added onto a house.
For example, some cities have strict guidelines that a one-story patio cover structure should not exceed 12 feet in height when attached to a residence. When building a patio cover onto a home, it must only be used for recreational purposes.
Before hammering that first nail into your patio roof, you may need a building permit. As a homeowner, you will have to prepare accurate, legible, and complete drawings of your patio roof plans. A city department will likely review your drawings in detail to check that they comply with local Zoning Ordinance and Building Codes prior to issuing a permit.
To review, your residential building permit application for a patio roof is likely to require:
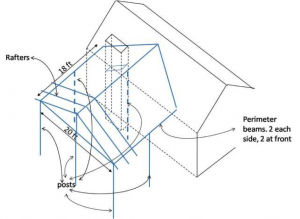
- Roof Framing Plan – Needed to indicate the layout for the patio roof location and all framing members; width of openings in patio wall supports should also be included.
- Plot Plan – Needed to indicate lot coverage requirements to prove compliance with Zoning Ordinance and Building Codes.
- Cross Section Drawing – Needed to indicate the spacing and size of all framing members, roof covering materials, rafter to beam connections, beam to post connections, rafter connections to exterior walls, post to footing connections, and footing size and depth.
- Foundation Plan – Needed to indicate footing design to establish minimum depth and concrete mix requirements.
And don’t forget – property specifics may have additional requirements in order to gain approval for a residential building permit. A house on a hillside may require a grading and drainage plan before patio roof construction can begin; houses located in historic preservation subdivisions may require additional approval from local historic preservation offices.
If all of the above building requirements for a simple patio roof have your head spinning, you’re certainly not alone. If you have experience as a contractor, this DIY project may be right up your alley. For any related questions or concerns, make sure to contact a roofing company to stay within local building guidelines.
Now that you know what it takes to build the best patio roof money can buy, it’s time to move on to everyone’s favorite subject… roof cleaning! In the next chapter, we’re going to teach you exactly how to extend the life of your roof with regular cleaning.